5/6/09

Amazon has a new feature, reserved instances.

Basically you pay a one time up front fee, and it drastically lowers your hourly $ cost per instance.

You can have a small instance (Small Instance (Default) 1.7 GB of memory, 1 EC2 Compute Unit (1 virtual core with 1 EC2 Compute Unit), 160 GB of instance storage, 32-bit platform)

For around - 65$/month - 780$/year, you could have a dedicated server ... pretty sweet deal.

Now if you add in the reserved instance's feature...

A small instance will cost
$325(reserved instance fee) + $262/year = $587/year ... even better deal.

Sign up for 3 years, and you now are paying...
$587 1st year, and then $262 ... end of 3 years total = $1111 compared to $2340 for the regular price for 3 years.


4/9/09

Rebundeling a running ec2 instance....

ec2-bundle-vol --prefix what_you_want_to_name_it -d /mnt/ami -c pathtocert.pem -k pathtokeyfile.pem -u 123456789 -s 10240 --kernel aki-9b00e5f2 -r i386

-d, --destination PATH
-c, --cert PATH
-k, --privatekey PATH
--kernel ID Id of the default kernel to launch the AMI with.
-r, --arch ARCHITECTURE Specify target architecture. One of ["i386", "x86_64"]
-s, --size MB The size, in MB (1024 * 1024 bytes), of the image file to create. The maximum size is 10240 MB.

(change the kernel type and arch to suite your needs... might as well use the largest size 10240)

This will bundle your running instance, and place the files in /mnt/ami

ec2-upload-bundle -b bucketname -m /mnt/ami/what_you_named_it.manifest.xml --access-key XYZ --secret-key XYZ

This will upload your bundled image to your bucket.

ec2-register /bucket/what_you_named_it.manifest.xml

The last step is to register your image, you will get back the AMI ID, and can either start your instance on the cmd line, or simply login to the web console and start it.

Nagios - Instead of a ping check to see if a host is alive, use http instead

Sometimes (often) ICMP is blocked, so you can't ping check your hosts to see if they are alive.

You can add this to commands.cfg and hosts.cfg for those hosts to check via http instead.

commands.cfg
define command {
command_name check-host-alive-by-http
command_line $USER1$/check_http -H $HOSTADDRESS
}

hosts.cfg

define host{
host_name hostname.com
address ip.address
alias hostnamealias
use networking_machines_template
check_command check-host-alive-by-http
}

4/8/09

Installing Nagios

Installing Nagios
---------------------
*need to have basic centos install, with apache installed.


Install rpmforge repo

wget http://apt.sw.be/redhat/el5/en/i386/RPMS.dag/rpmforge-release-0.3.6-1.el5.rf.i386.rpm
wget http://apt.sw.be/redhat/el5/en/x86_64/RPMS.dag/rpmforge-release-0.3.6-1.el5.rf.x86_64.rpm
rpm --import http://dag.wieers.com/rpm/packages/RPM-GPG-KEY.dag.txt
rpm -K rpmforge-release-0.3.6-1.el5.rf.*.rpm #verify package
rpm -i rpmforge-release-0.3.6-1.el5.rf.*.rpm #install package

Install yum-priorities #this is't required, but I like to limit the rpmforge repository from effecting any base packages

yum install yum-priorities
#Make sure that yum-priorities is enabled by editing the /etc/yum/pluginconf.d/priorities.conf
#Edit the .repo files in /etc/yum.repos.d/ and set up priorities by adding the line: (lower number = higher priority, 0 = disabled)
priority=N


Install nagios packages

sudo yum install nagios nagios-devel nagios-plugins nagios-plugins-setuid rrdtool


Configure Nagios

sudo htpasswd -c /etc/nagios/htpasswd.users kylec #Create htpasswd file for auth
sudo htpasswd /etc/nagios/htpasswd.users username #for adding users

sudo vi /etc/nagios/nagios.cfg
comment out...
#cfg_file=/etc/nagios/objects/templates.cfg
#cfg_file=/etc/nagios/objects/localhost.cfg
add...
cfg_file=/etc/nagios/objects/hosts.cfg
cfg_file=/etc/nagios/objects/hostgroups.cfg
cfg_file=/etc/nagios/objects/services.cfg
cfg_file=/etc/nagios/objects/contactgroups.cfg
set...
process_performance_data=1
host_perfdata_command=process-host-perfdata
service_perfdata_command=process-service-perfdata


sudo vi /etc/nagios/cgi.cfg
set...
authorized_for_system_information=*
authorized_for_configuration_information=*
authorized_for_system_commands=*
authorized_for_all_services=*
authorized_for_all_hosts=*
authorized_for_all_service_commands=*
authorized_for_all_host_commands=*


----------------------------------------------------------------------------------------------
Installing Nagios pnp

wget http://switch.dl.sourceforge.net/sourceforge/pnp4nagios/pnp-0.4.13.tar.gz
./configure
make all
make fullinstall

edit hosts.cfg

add:

define host{
use generic-host,host-pnp #add host-pnp to networking_machines_template


define host {
name host-pnp
register 0
action_url /nagios/pnp/index.php?host=$HOSTNAME$' onmouseover="get_g('$HOSTNAME$','_HOST_')" onmouseout="clear_g()"

}

edit services.cfg

Add to the main template... (in my case basic-service)

define service{
use generic-service,srv-pnp (srv-pnp is whats added)
name basic-service
.... truncated


define service {
name srv-pnp
register 0
action_url /nagios/pnp/index.php?host=$HOSTNAME$&srv=$SERVICEDESC$' onmouseover="get_g('$HOSTNAME$','$SERVICEDESC$')" onmouseout="clear_g()"

}

edit commands.cfg

add:

define command {
command_name process-service-perfdata
command_line /usr/bin/perl /usr/local/nagios/libexec/process_perfdata.pl
}

define command {
command_name process-host-perfdata
command_line /usr/bin/perl /usr/local/nagios/libexec/process_perfdata.pl -d HOSTPERFDATA
}

comment out the existing SAMPLE PERFORMANCE DATA COMMANDS

setup configs

cd /usr/local/nagios/etc/pnp/
sudo mv npcd.cfg-sample npcd.cfg
sudo mv process_perfdata.cfg-sample process_perfdata.cfg
sudo mv rra.cfg-sample rra.cfg


If you are seeing ... "File does not exist: /usr/share/nagios/pnp," in your httpd logs.
cp -R /usr/local/nagios/share/pnp/ /usr/share/nagios/pnp

edit as you would like them.

start npcd
/etc/init.d/npcd start
-------------------------------------------------------------------------------------------------------


EXAMPLE .cfgs #this is custom, these are just some examples to get you started.

contacts.cfg

define contact{
contact_name kyle
alias kyle
service_notification_period 24x7
host_notification_period 24x7
service_notification_options w,u,c,r
host_notification_options d,u,r
service_notification_commands notify-by-email
host_notification_commands host-notify-by-email
email kyle@email.com
}

contactgroups.cfg

define contactgroup{
contactgroup_name admins
alias admins
members internal_infosec, kylepager
}


hosts.cfg

define host{
host_name website.com
address website.com
alias website.com
use networking_machines_template
}


hostgroups.cfg

define hostgroup{
hostgroup_name webservers
alias webservers
members server1, server2, server3, website.com
}

services.cfg

define service{
use basic-service
hostgroup_name webservers
service_description HTTP
check_command check_http!
contact_groups admins
}

4/6/09

Use nmap to scan for conflicker...

Use nmap to scan for conflicker...
http://seclists.org/nmap-dev/2009/q1/0869.html

get the latest of nmap, and install lua

Directions for ubuntu ...

sudo apt-get install lua50

wget http://nmap.org/dist/nmap-4.85BETA7.tar.bz2
tar -jzxvf nmap-4.85BETA7.tar.bz2
./configure
make

./nmap -sC --script=smb-check-vulns --script-args=safe=1 -p445 -d -PN -n -T4 --min-hostgroup 256 --min-parallelism 64 -oA conficker_scan 192.168.1.1/24 | grep Conficker:


You should see all

| Conficker: Likely CLEAN

Just remove the grep filter to see the host if you get any other results.

4/3/09

Modified pidgin SMS for added functionality


This is by no means very well written. But its a short easy hack to get IM's sent to you via SMS, that is somewhat dynamic so you can receive them from anyone you have it setup for.

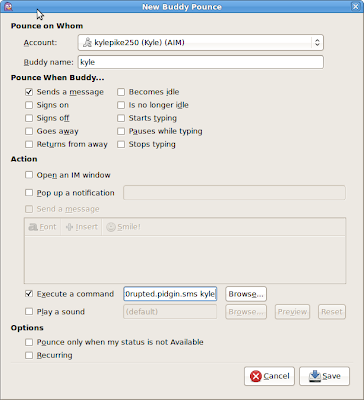
1.) Select buddy to add pounce
2.) Select your bounce options
3.) Select it to execute your script, and after the script path, add the full buddy name (this will be the path to the log that is the variable part)


The only part I don't have very dynamic is this will only work the way its intended if your buddy's are all under the same account, you need to have a different script for each account you use.

pidgin.sms.sh
------------------------------------------------------------------------------------------------------
#/bin/bash
#Written by kylepike
#This script will send you an sms txt alert if you have a buddy pounce setup in pidgn
#The argument you need to pass in is the full "buddy name" in the "New buddy pounce" window


buddyfolder="/home/kyle/.purple/logs/jabber/kyle@k0rupted.domain.net/$1"

cd $buddyfolder

file=`ls -lrt | tail -n 1 | awk '{ print $8}'`
lynx --dump $file | tail -n 1 > ~/scripts/emailmessage.txt
scp ~/scripts/emailmessage.txt kyle@k0rupted.domain.net:~/scripts/emailmessage.txt

ssh kyle@k0rupted.domain.net /home/kyle/scripts/smsme.sh
-------------------------------------------------------------------------------------------------------


smsme.sh on the remote sendmail server, you could incorporate this into one if you have a working sendmail server on your computer/laptop. But like I said in the earlier post, I'm always roaming, and paranoid and I would't want to send my sms out from an unsecure network clear txt.

#!/bin/bash
# script to send simple email
# email subject
sn="SenderName"
SUBJECT="IM FROM $sn"
# Email To ?
EMAIL="123456789@messaging.sprintpcs.com"
# Email text/message
EMAILMESSAGE="/home/kyle/scripts/emailmessage.txt"
#echo "IM Reminder"> $EMAILMESSAGE
#echo "From Blah" >>$EMAILMESSAGE
# send an email using /bin/mail
/bin/mail -s "$SUBJECT" "$EMAIL" < $EMAILMESSAGE

4/1/09

Pidgin SMS via buddy pounce over ssh

K, so you want to receive an alert that you got an important IM that you were waiting for. Or Dreading ... Also if you wanted to know if someone signed online and where waiting to talk to them, basically any of the buddy pounce rules can trigger the SMS.

Either way, you need to know that you got it and don't want to wait by your computer. Here is a quick and dirty way to get the job done.

For my setup I have a laptop that is often roaming, so using a local sendmail server wasn't really an option. And I have my own server running at home, with a reliable sendmail server, so my best bet was to send the alerts from there. But I also don't want to open the port for the whole world (also my ISP won't allow SMTP port), so I will do this all over ssh. Also because im a paranoid nut job.

What you Need
----------------------
1.) pidgin
2.) linux or have ssh installed via cmd line in windows (ur on your own there)
3.) private key auth to your server
4.) an external server (you could just run this all locally if you can send mail from your desktop/laptop)


On the server create: smsme.sh ... of course you can change these contents to send whatever you would like.

vi smsme.sh
chmod +x smsme.sh
-----------------------------

#!/bin/bash
# script to send simple email
# email subject
SUBJECT="While you were away"
# Email To ?
EMAIL="123456789@messaging.sprintpcs.com" #use your cell email address
# Email text/message
EMAILMESSAGE="/home/scripts/emailmessage.txt"
echo "IM Reminder"> $EMAILMESSAGE
echo "From Person's Name" >>$EMAILMESSAGE
# send an email using /bin/mail
/bin/mail -s "$SUBJECT" "$EMAIL" < $EMAILMESSAGE


-----------------------

On your client/laptop/desktop create pidgin.sh

echo "ssh username@hostname /home/username/smsme.sh" > pidgin.sh
chmod +x pidgin.sh

Then in pidgin select your important contact that you don't want to miss their IM, and select your desired options, and then selected "execute a command" and point it to your pidgin.sh


All set, based on your buddy pounce rules, you will receive an SMS alert that you got the IM. I want to figure out a way now to include the contents of that IM.